During your 3D printing journey, you'll likely encounter STL files that you want to tweak or modify before sending them to your printer. Whether you're customizing a model by cutting holes in it, joining two STLs together, or addressing minor flaws, modifying an STL file can significantly enhance the final print. One of the best tools for this task is Blender, a free and open-source 3D creation suite.
Whether you want to join two objects together or cut a hole in an object you've downloaded from the web, this article is for you. Let's get started.
Step 1: Download the latest version of Blender
If you don't already have Blender installed on your computer, head over to https://www.blender.org/download/ an download the latest version of Blender for your operating system.

Step 2: Import the STL file you want to modify
3D printable designs are most commonly stored digitally on a computer as STL files. With Blender, you can import any STL file you'd like to modify. Before we import an STL, let's clear any existing objects from our scene.
How to Delete all Existing Objects in a Blender Scene:
- Simply press "A" to select all the objects in the scene.
- Press "X" to open the delete dialog box and either navigate to "delete" or simply press "D".
Importing an STL File:
To load a 3D model or STL into our now-empty scene, navigate to File ➡️ Import ➡️ STL. Upon importing an STL file, it might not be centered in Blender's viewport, or it could appear extremely large. Here's how you can move the object to the center of the scene in Blender and adjust the view to fit the object:

Centering the STL File and Fixing View Clipping:
Depending on how the designer exported their design, the model might not be centered in the Blender scene upon import. Additionally, as you zoom out, the model might start "clipping." First, let's address the clipping issue, and then we'll move on to centering the object. We'll need to center it in two ways: setting the object's origin point to (0,0,0) and aligning all of its individual vertices.
Fixing Viewport Clipping and Setting Origin Point to (0,0,0):
Open the view panel by pressing "N" on your keyboard. Select the "View" tab and adjust the "End" value to 10,000 or a higher value, depending on the size of the object within the scene. Next, navigate to the "Item" tab and set the X, Y, Z location coordinates to (0,0,0).

Setting the Object's Origin Point to the Center of it Vertices:
Now that we have set the object's origin point to (0,0,0), we can also center the object's vertices around the origin. The images below will help clarify:

You can see that the object's origin point is at the scene's (0,0,0) coordinates, but the origin is still on the corner of the object and not in the center. To fix this, we need to go into Edit Mode where we can select all the object's vertices, the points that make up the object/STL file. To go into Edit Mode, click the drop-down on the top left that says "Object Mode". In Blender, Object Mode allows you to move, scale, rotate, and apply modifiers to the object. Edit Mode, on the other hand, lets you modify the vertices, edges, and faces of an object.

In Edit Mode, press "A" to select all vertices. The vertices and edges should turn yellow/orange to indicate they are selected. Now, press "N" to open the item properties panel and set the global median coordinates to (0,0,0).

Now that the object is centered, return to "Object Mode" so we can proceed with modifying the STL file.
Step 3: Modifying/Cutting Holes in the STL Design
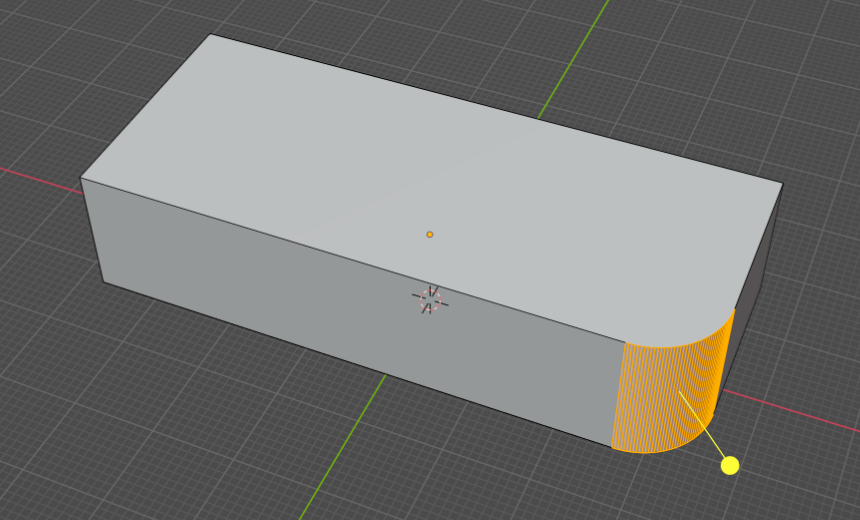
Suppose you want to cut a square-shaped hole out of this object. How should you approach it? A straightforward method is to create a box with the desired dimensions of the hole and use it to subtract from our original object. Let's start by creating the box.
Go to Add ➡️ Mesh ➡️ Cube. Remember to make sure you are in object mode. Also, when you create the cube it will be very small: 2mm x 2mm x 2mm. You can use the item properties panel ("N") or the quick tool on the left hand side of the screen to move, scale, and resize the box.

What are the default units in Blender?
The item properties panel displays the object's dimensions in millimeters, even though they appear to be in meters. By default, Blender's units seem to be in meters, but when you export the STL file, you'll find it's actually in millimeters. You can keep the default units as meters, but be aware that when you export the STL file, it will be in mm. My screenshots show "mm" because I had previously set up Blender to display the correct unit symbol. Going into setting the units for this tutorial would make it excessively lengthly.

Step 4: Using the Boolean Modifier to Cut a Hole
Now that you have your cube (or "box") positioned where you want the hole to be, the next step involves using a technique called a Boolean operation. This operation allows you to use one object (in this case, the cube) to subtract from another object (our original STL file).
Here's how you can achieve this:
Select the STL Object: Ensure you're in "Object Mode" and click on your original STL object to select it.
Add a Boolean Modifier: In the Properties Panel on the right, click on the wrench icon, which represents the Modifiers tab. Click on "Add Modifier" and choose "Boolean" from the list.


Choose the "Difference" Operation and Object: In the Boolean modifier settings, set the "Operation" to "Difference". For the "Object" field, select the cube (box) you added. This tells Blender to subtract the cube's shape from the original STL object.

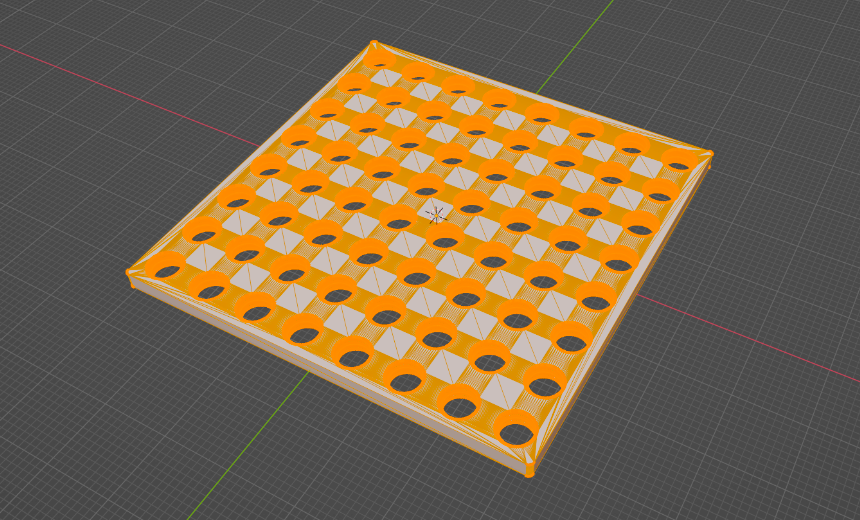
Apply the Modifier: Once you've set up the Boolean modifier, click on "Apply". This will make the changes permanent, and you'll see a hole in your object in the shape of the cube.
Delete the Cube: After applying the Boolean modifier, the cube you used to make the hole will still be visible. You can delete the box by pressing "X" on the keyboard.

Inspect Your Modified Object: Rotate around your object in the 3D view and ensure the hole is exactly where and how you wanted it.
Remember, while the Boolean modifier is powerful, it can sometimes produce unexpected results depending on the complexity of your objects and their relative positions. It's always a good idea to save your work before applying any significant modifications.
If it produces unexpected results, make sure not to have any faces perfectly overlapping. Also, try switching between "Fast" and "Exact" in the Boolean Modifier settings. If you are still experiences issues please email info@3dprinteracademy.com and we'll do our best to help.
Step 5: Export the Modified STL File
Go to File ➡️ Export ➡️ STL.
There you go! You've now learned how to make a custom hole in your STL object using Blender. To join two objects together you can also use the Boolean modifier, but instead of "Difference" set it to "Union". Remember, the Boolean Modifier can be fickle at times. Good luck! If you have any questions feel free to reach out to info@3dprinteracademy.com. We usually respond in under 24 hours.